Obtaining an OpenSSL Certificate
This page explains how to obtain an OpenSSL certificate. For instructions on applying the certificate files in MAPS, see HTTP and HTTPS File Server.
Users should have a good working knowledge of web security before using the information on this page.
Download OpenSSL
This tutorial uses OpenSSL, a commercial grade, open source implementation of SSL/TLS. You can obtain OpenSSL from http://www.openssl.org. Please refer to their documentation for installation instructions.
Obtaining an SSL Certificate
Obtaining an SSL certificate requires the use of OpenSSL. If you have not installed OpenSSL, please do so before continuing. For the purposes of this guide we will assume that OpenSSL was installed in the default location (C:\OpenSSL).
This document provides an overview of obtaining an SSL Certificate for use with MAPS through several different processes. The first section details how to obtain a new SSL Certificate from a Certificate Authority, while the later section explains how to extract a certificate from an existing web server, IIS in our example, and convert it to a format compatible with MAPS.
Creating a New SSL Certificate
Obtaining an SSL Certificate is a three-step process. First, we will need to create a private key. Next, we will use the private key and OpenSSL to generate a Certificate Request. And, finally, we will request a new certificate from a Certificate Authority. You can also generate a self-signed certificate for testing purposes, however for security reasons a self-signed certificate should never be used in a production environment.
Generating a Private Key
Generating a new private key is a simple task using OpenSSL. Open a Windows Command Prompt (Start -> Run -> 'cmd') and navigate to the working directory of your choice. From this location enter the following command to generate the key:
C:\OpenSSL\bin\openssl genrsa -out MyPrivateKey.key 2048
Note that we have elected to generate a private key without password protection. The use of password-protected keys is not supported by MAPS. A password-protected key would require the password to be entered every time the MAPS HTTPS server accesses the certificate.
Your private key should be stored in a secure location and never distributed to any other party. Messages encoded using your public key can only be decrypted using your private key. For more information on public-key cryptography, refer to http://en.wikipedia.org/wiki/Public-key_ cryptography.
Please refer to the OpenSSL documentation for more information about generating keys with OpenSSL.
Creating a Certificate Request
Creating a certificate request is another simple task using OpenSSL. Open a Windows Command Prompt (Start -> Run -> 'cmd') and navigate to the working directory of your choice (preferably the directory containing MyPrivateKey.key). From this location, enter the following command to generate the Certificate Request:
C:\OpenSSL\bin\openssl req -new -key MyPrivateKey.key -out MyCertificate.csr
During the process of generating the certificate request, you will be required to answer a series of questions about your certificate. The Common Name field must exactly match the domain/host you wish to protect.
Country Name (2 letter code) [AU]: US
State or Province Name (full name) [Some-State]: California
Locality Name (eg, city) []: Irvine
Organization Name (eg, company) [Internet Widgits Pty Ltd]: The Widget Company
Organizational Unit Name (eg, section) []: .
Common Name (eg, YOUR name) []: www.widgetcompany.com
Email Address []: admin@widgetcompany.com
Please enter the following 'extra' attributes
to be sent with your certificate request
A challenge password []: mypassword
An optional company name []: The Widget Company
When complete you will have a Certificate Request file (.csr) that you can use to obtain a certificate from a Certificate Authority.
Please refer to the OpenSSL documentation for more information about generating Certificate Requests.
Requesting a Certificate from a Certificate Authority
The final step in obtaining your SSL Certificate is requesting it from a Certificate Authority using the Certificate Request you created in the previous step. There are a wide variety of Certificate Authorities on the web, many of which will provide you with a trial certificate for free. Listed below are a few Certificate Authorities that you may wish to evaluate.
Follow the directions provided by the Certificate Authority of your choice to complete your request and obtain your certificate. Once you've obtained your certificate, return to the section Enabling HTTPS on your MAP Server.
Generating a Self-Signed Certificate
OpenSSL can be used to generate a self-signed certificate for testing purposes. A self-signed certificate should never be used in a production environment. The certificate will not be validated by Internet Explorer or any other SSL capable web browser, leaving the connection susceptible to third party attacks, such as “man-in-the-middle” attacks. Production environments should only use certificates obtained from a respected Certificate Authority, such as those mentioned in the previous section.
To generate a self-signed certificate, open a Windows command prompt (Start -> Run -> 'cmd') and navigate to the working directory of your choice (preferably the directory containing MyPrivateKey.key). From this location, enter the following command to generate the self-signed certificate:
C:\OpenSSL\bin\openssl req -new -x509 -key MyPrivateKey.key -out MyCertificate.crt -days 1095
You will be prompted for the same set of questions as if creating a Certificate Request. Answer the questions and your self-signed certificate, MyCertificate.crt, will be created. Once you've obtained your certificate, follow the instructions on the HTTP and HTTPS File Server page to enter your certificate and key files.
Using an existing SSL Certificate
Using an existing certificate is typically a two-step process. First, we need to extract the certificate from an existing web server (IIS in our example). After obtaining the certificate, we then need to use the OpenSSL tools to convert the certificate to a format compatible with MAP Server.
Extracting your SSL Certificate from IIS
If you have an existing SSL certificate installed on an IIS server, you can extract it for use with your MAP Server installation. The domain on your existing certificate will need to match the domain of the MAP server in order for the certificate to validate properly in your web browser.
To extract your certificate, first, launch the IIS Manager (iis.msc). Next, expand the explorer tree to access the website that contains the SSL certificate that you would like to extract. Right click on the desired website and select "Properties." On the Properties window, select the "Directory Security" tab, and click the "Server Certificate..." button to launch the "Web Server Certificate Wizard." Click "Next" on the Welcome Screen to continue through the wizard. On the next page, select "Export the current certificate to a .pfx file" as shown below.
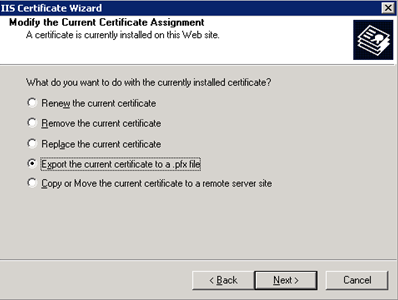
Click "Next" to continue through the wizard. On the screens that follow you will be prompted for an export path and a password for encrypting the contents of the certificate. Enter the required information to complete the wizard and extract the certificate as a PFX. Continue to the next section for information about converting your PFX certificate to PEM for use with MAP Server.
Converting from PFX to PEM
Converting from PFX to PEM requires the use of OpenSSL. If you have not installed OpenSSL, please refer to the "Obtaining OpenSSL" section before continuing. For the purposes of this guide we will assume that OpenSSL was installed to the default location (C:\OpenSSL) and that we have a valid PFX file named MyCertificate.pfx.
Open a Windows Command Prompt (Start -> Run -> 'cmd') and navigate to the directory containing your PFX file.
From this location enter the following command to convert the file:
c:\OpenSSL\bin\openssl pkcs12 -in MyCertificate.pfx -out MyCertificate.pem -nodes
If your PFX is password protected you will be prompted for a password before the conversion occurs. Once complete a new file, MyCertificate.pem, will be created in your working directory. The PEM file contains the key and certificate we will need to configure the MAP server, but first we will need to copy them out to separate files.
Copying the Key and Certificate from a PEM
Open the PEM file in your favorite text editor (Wordpad will work just fine). Copy from the line beginning "-----BEGIN RSA PRIVATE KEY-----" until you reach "-----END RSA PRIVATE KEY-----", including both of the ----- lines, and paste the contents in a new file called MyCertificate.key. Repeat the process for the certificate data, copying from "-----BEGIN CERTIFICATE-----" to "-----END CERTIFICATE-----" and pasting the contents into a new file named MyCertificate.crt.
We're now ready to add the key and certificate files to MAP Server.
Go back to HTTP and HTTPS File Server for instructions on installing the SSL certificate.